


Prerequisite:
Ubuntu installed
Installed java with environment variable set
Installed Hadoop with environment variable set( if not then install Hadoop)
Install and run HBase
To check the current version of Ubuntu type the below command
lsb_release -a
update and install squid
sudo apt update
sudo apt-get install squid
Download HBase from official site of the HBase
Apache HBase – Apache HBase Downloads
Extract the Hbase archive downloaded.
tar xvf hbase-<version>.tar.gz
sudo mv hbase-<version>/ /
configure bashrc file to set environment variables
vim ~/.bashrc
paste this line with changing the path
export HBASE_HOME=/home/ashwin/hbase-<version>
export PATH=$PATH:$HBASE_HOME/bin
update the bashrc
source .bashrc
Open the file for editing.
sudo vim /usr/local/ashwin/conf/hbase-site.xml
Now add the following configurations between the <configuration> and </configuration> tags to look like below.
<configuration>
 <property>
 <name>hbase.rootdir</name>
 <value>file:/hadoop/HBase/HFiles</value>
 </property>

 <property>
 <name>hbase.zookeeper.property.dataDir</name>
 <value>/hadoop/zookeeper</value>
 </property>
</configuration>
Now start Hadoop by using
start-all.sh
Now start HBase by using
start-hbase.sh
the first task was done! 🙂 take a rest and come again for the next task
Use DDI and DML commands.
Let us see each DDL command in detail.
1. Create Table
Using create table command we can create a table by specifying the table name and column family.
Syntax
hbase(main):006:0> create ‘table name’,’column family’
Here we have created a table ‘employee’ with a two-column family (‘emp_address’,’emp_records’).
Command
hbase(main):006:0> create 'employee','emp_address','emp_records'
2. List
List command is used to display the tables which are present in HBase.
Syntax
hbase(main):006:0> list
Command
hbase(main):006:0> list
3. Describe
Describe command is used to display the table name with column families, associated filters, versions, and few more details.
Syntax
hbase(main):030:0> describe 'tablename'
Command
hbase(main):030:0> describe 'employee'
Let us see each DML command in detail.
1. Put
Put command is used to insert data in a table
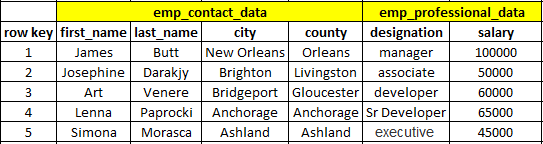
To perform the Put operation, we will create a table with the name "employee" and insert data.
The structure of the table should look like below.
Syntax
hbase(main):015:0> put <'tablename'>,<'rowname'>,<'columnvalue'>,<'value'>
Command
hbase(main):015:0> create 'employee','emp_contact_data','emp_professional_data'
hbase(main):016:0> put 'employee','1','emp_contact_data:first_name','James'
2. Count
The count command is used to count the number of rows present in a table. Using the “Cache” option we can restrict the row which should be displayed. The default size of “Cache” is 10 rows.
Syntax
hbase(main):047:0> count <'tablename'>, CACHE =>1000
Command
hbase(main):047:0> count 'employee'
The below command is fetching 1000 rows at a time. In the output, the result is showing only five rows because there are only five rows present in table “employee”.
hbase(main):048:0> count 'employee',CACHE=>1000
3. Get
Get command is used to read data from a table.
Using the get command, we can read a single row of data at a time.
Syntax
hbase(main):051:0> get ’<table name>’,’row1’
Command
hbase(main):051:0> get 'employee', '1'
4. Scan
Scan command is used to view the complete data of a table “employee”.
Syntax
hbase(main):059:0> scan ‘<table name>’
Command
hbase(main):059:0> scan 'employee'
Done!🙂